


WEDDING PHOTOGRAPHERS IN LOVE
GREENVILLE, SC & BEYOND


3 Ways To Light Beautiful Reception Images
December 10, 2015
Today’s post is part of blog series in which we get the privilege of answering some of the questions we have gotten about photography, marriage and life! We know there are so many other amazing photographers out there who would know the answers far better than we ever could. But it’s not about us. It’s not about how good or not good we might be in comparison to someone else. It’s about serving. And if this series helps one person, it was worth it! You can catch up on the series here:
#1 | Where Do I Start?
#2 | Needle In A Haystack
#3 | A Natural Feel
#4 | 4 Keys To A Consistent Style
#5 | 5 Questions To Answer Before Going Full-Time
#6 | 3 Ways To Light Beautiful Reception Images
#7 | 1 Simple Trick To Improve Your Images Right Now
#8 | 3 Tips To Thrive On A Double-Header Weekend
Ryan & Alyssa,
As I look at my wedding images from this entire year, I have one glaring weakness: reception images. Hopefully you guys can relate to that! It’s not that the images are undeliverable. My wedding couples have never complained. But as I build my wedding blogs after each wedding, I find that I often have very few reception images I am proud of! Maybe a better way of saying it is that my reception photos don’t seem to match my brand. It’s like you’re scrolling through the wedding and you can immediately see where I went from beautiful outdoor shots to dark, dull reception images. Can you help! How can I translate my bright, light style to my receptions? Thanks in advance! I know you guys are busy!
PBH
Let us be the first to say, our reception images are a work in progress! We are continuing to learn and grow with every wedding! And if we are honest, that’s really the key. You can’t expect to radically change your images overnight. Here’s how we look at it. This philosophy has never failed us. After every wedding, we look at what we did well and what we could have done better. We write those thoughts down or, at the very least, we talk about them. Then we high five over the things we did well! Finally, we discuss solutions to the things we could have done better.
The results of that process, over time, are incredible!!! We are different photographers than we were a year ago. And we will be different photographers a year from now. If you don’t consider what you can do better, you will never get better.
All that to say, you are on the right track!!! You have identified something you need work on! And we all need work! But it’s about taking baby steps to get better. So we are hopefully going to help you take a few baby steps today!
We considered several ways to best answer your question. But ultimately it boiled down to this: The only way we know how to answer questions is to look at it from our perspective. And since you asked us!!!…we are going to tell you exactly how we shoot a reception to get consistent, brand-worthy images! We are going to show you some images from Ivan & McKenzie’s recent wedding reception. We will also show you a layout of the room, where we were standing, and where our flashes were positioned. We think that by seeing exactly how we move around a reception and make use of our flashes, you can glean some understanding of how to improve your images!
But first, some basic you-might-already-do-this-but-we-are-going-to-tell-you-anyway information!
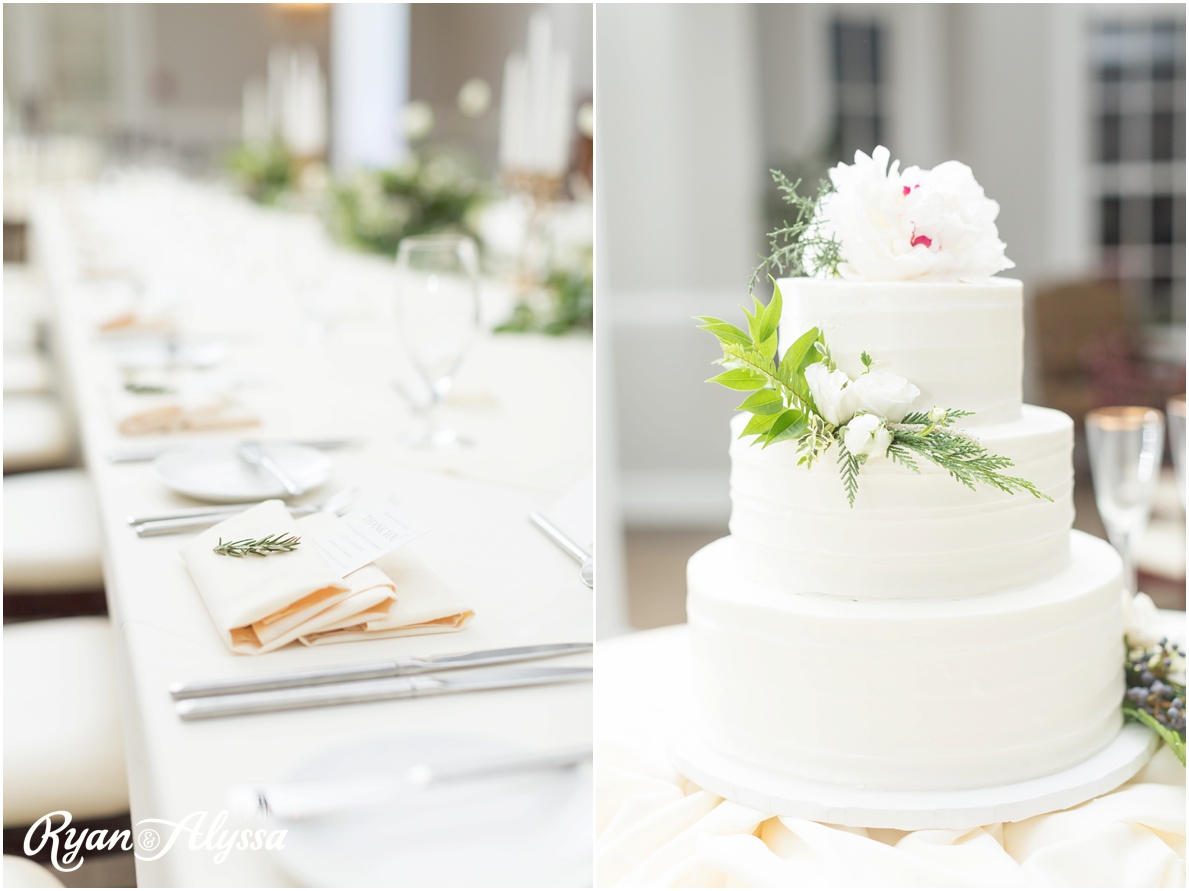
During most of the reception, we are using 4 Canon 600ex-rt flashes. Most of the time (you can probably sense some exceptions coming) we each have one flash on-camera and one flash off camera on a stand. One of the great things about the 600ex-rt’s is that they can communicate to one another with radio waves. So as long as we are within the general vicinity of our off-camera flash, we can control that flash as well as the one on our camera. The reason we use an off camera flash in addition to our on-camera flash is that it gives dimension to our images. If you look at the cake image above, you will see that the left side of the cake is lighter than the right side. That’s because we used an off-camera flash to light the left side. More on that later.
Another thing you should know is that we use our flashes on manual mode, not ETTL mode. The basic difference is that in ETTL your flash is attempting to calculate the flash power you need to light your subject while in manual mode, you are controlling that decision on the back of your flash throughout the reception. We are “Team Manual Mode” all the way! If you need any more proof, check out our video series on using your camera in Manual Mode!
Alright, enough background info! Let’s get to these images!!!
1. One On-camera Flash, Two Off-Camera Flashes
Remember how we said there would be exceptions? Well, let’s get one out of the way right off the bat! The next 3 images are detail photos of the reception setup before anyone arrived. Generally, during this time, Alyssa is actually shooting and Ryan is finagling the lights so that everything looks just right. It’s a team effort!!!…especially on a wedding day like this where we had about 10 minutes to shoot this room and bolt 30 minutes back to the ceremony location! Yikes!
So, a quick explanation of what is actually happening in these 3 images. Alyssa is shooting. Alyssa has an on-camera flash. BUT, Alyssa’s on-camera flash is not firing. It is only used to control the other 2 lights. Keep that in mind. Ryan is handling 2 lights on stands and moving them around the room based on what Alyssa is shooting. The reason Alyssa’s flash is not set to fire is that we don’t want the harsh directional light of an on-camera flash for these details. We want soft light from a different angle. This technique mimics natural light! Let’s look at each of these images individually.
This first image is a table shot. Remember, Alyssa’s flash is not firing. But you can see in the diagram that the two off-camera flashes are firing. Ryan placed those in strategic positions to light up the table Alyssa is shooting and to light up the background as well.
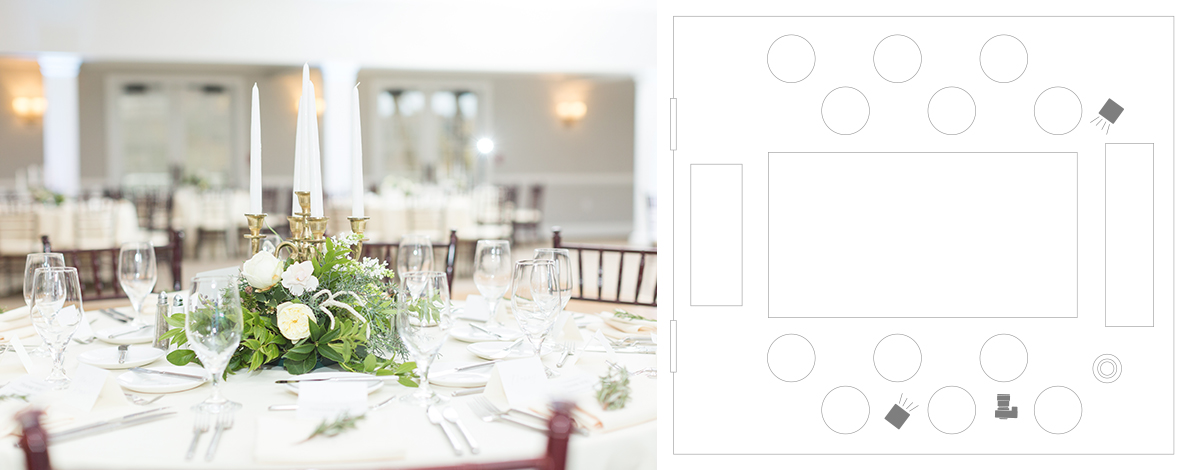
This second image uses the same exact technique. Alyssa’s flash is not firing. The two off-camera flashes are set in the same places as the last image. You can see how the flash off the right side of the images lights up the foreground table while the flash off to the left side of the image lights up the rest of the room.

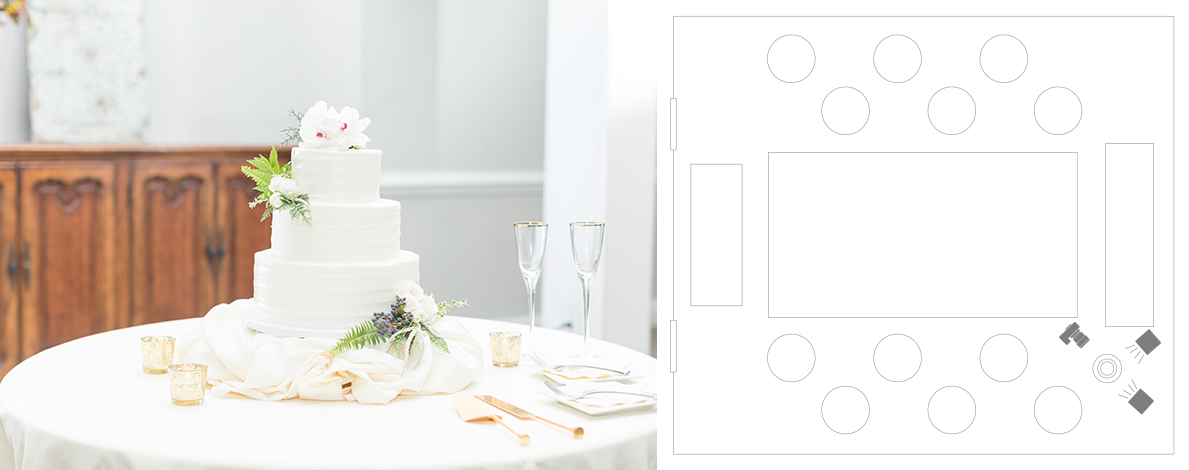
This image of the cake table uses the same basic technique, but the flashes are place differently. Once again, Alyssa’s flash is not firing. However, the first off-camera flash is placed directly behind the cake, but not visible in the photo. The second flash is placed off to the left side of the photo and adds a nice light to the left side of the cake. Using an on-camera flash would have put to much direct light on the cake and given it the “flash look.”
2. One On-camera Flash
Ok so we are actually going to hit another way to use your off camera flash! We want to show you as many different situations as possible in the same room. This one is not used quite as much as the other two, but still important to mention!
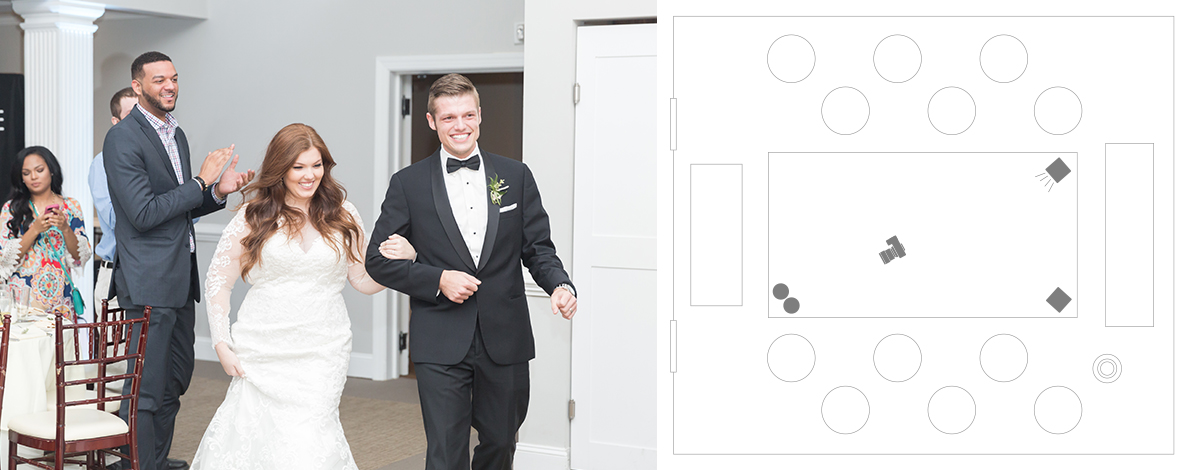
Here’s the situation. We have our off camera-flashes set up for the first dance. But Ivan & McKenzie are making their entrance. We don’t want to sacrifice our lighting setup for the first dance to have a better lighting setup for the entrance. It’s just not quite as important. You have to make that judgement call. So for this shot, Ryan has his on-camera flash firing at Ivan & McKenzie as they enter. His off-camera flash is actually firing as well, but it’s almost directly behind him and firing the same direction as his on-camera flash, meaning it’s pretty much not involved in the shot. Check out the layout below.
3. One On-camera Flash, One Off-Camera Flash
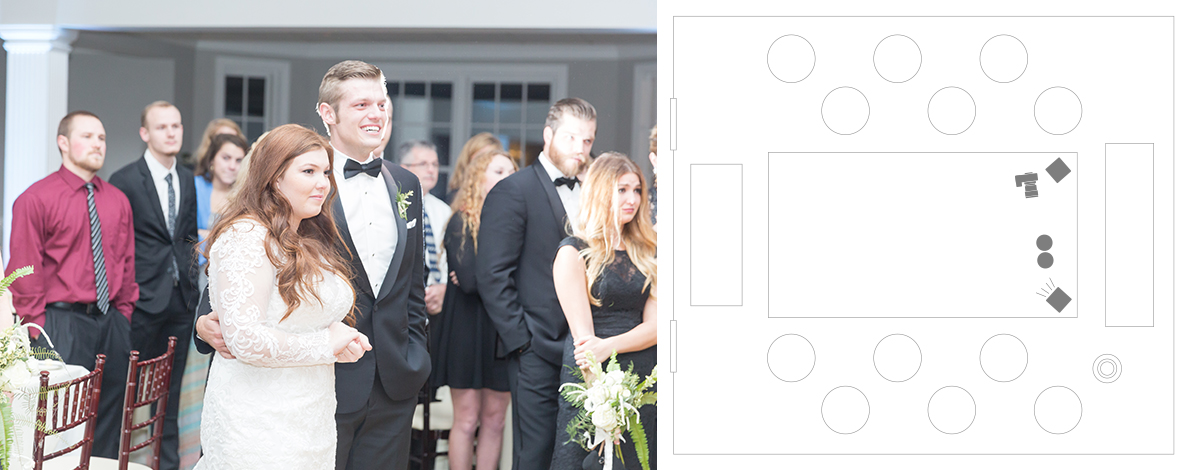
Ahhhh, yes. Here we are! This is by far the most common setup for us during receptions. We each control two flashes. One on-camera, one off-camera for a total of four flashes in the room.
Let’s run through a quick description of each of these images. The first image you see below is one of Alyssa’s images from the first dance. Her on-camera flash is firing in the direction of Ivan & MacKenzie. However, if that was the only light hitting them, the image would lack dimension and you would get that harsh “flash look” that we try to avoid at all costs! You can see where Alyssa’s off-camera flash comes in from the right side and hits the couple, giving them some magical hair light. Bam! That’s what we want! See the layout to see exactly how this was set up!

The next image was taken during the Father-of-the-bride speech. Which, if you haven’t read, you need to stop right now and do it! See it here! This shot is interesting for one specific reason. The flash going off in the background and adding the rim lighting to Ivan is Alyssa’s flash. However, this is Ryan’s image. How is this possible? One of the other amazing things about the Canon 600ex-rt’s is that they communicate on channels. So if Ryan wants to commandeer Alyssa’s flash for a second, he just changes to her channel! How cool is that?! So in a quick, emotional moment like this, Ryan was able to quickly switch channels and get a much better image than he could without Alyssa’s off-camera flash adding the rim-light!
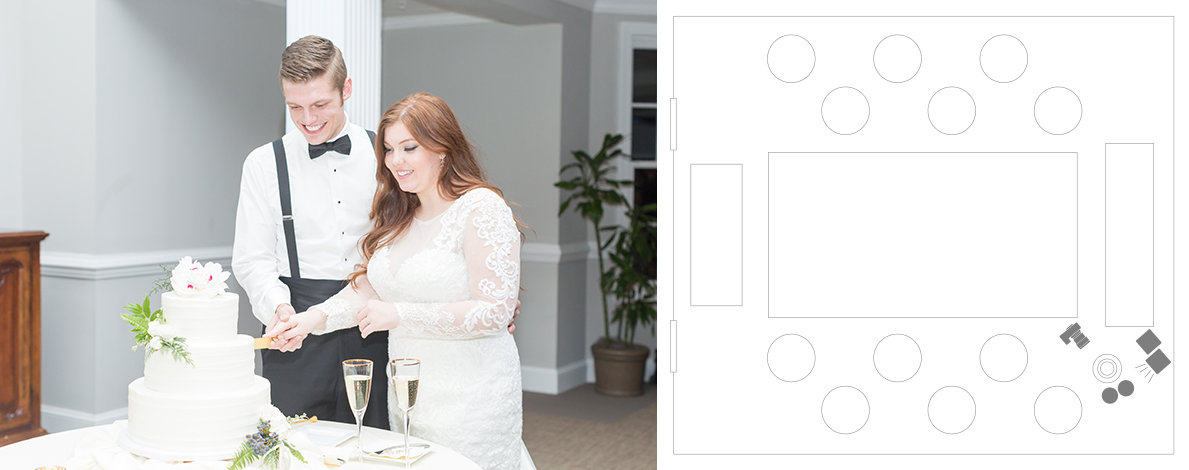
The cake table was in a different area of the room. And it certainly wasn’t going to be lit properly with our flashes set up to light the dance floor! So, when the DJ informed us that we were 2 minutes from the cake cutting, we pulled both of our off-camera flashes to that area of the room. This first image doesn’t have a lot of off-camera lighting, but it adds a lot of light on the walls to the left side of the image. That makes our image brighter and more in line with our brand! Huge!
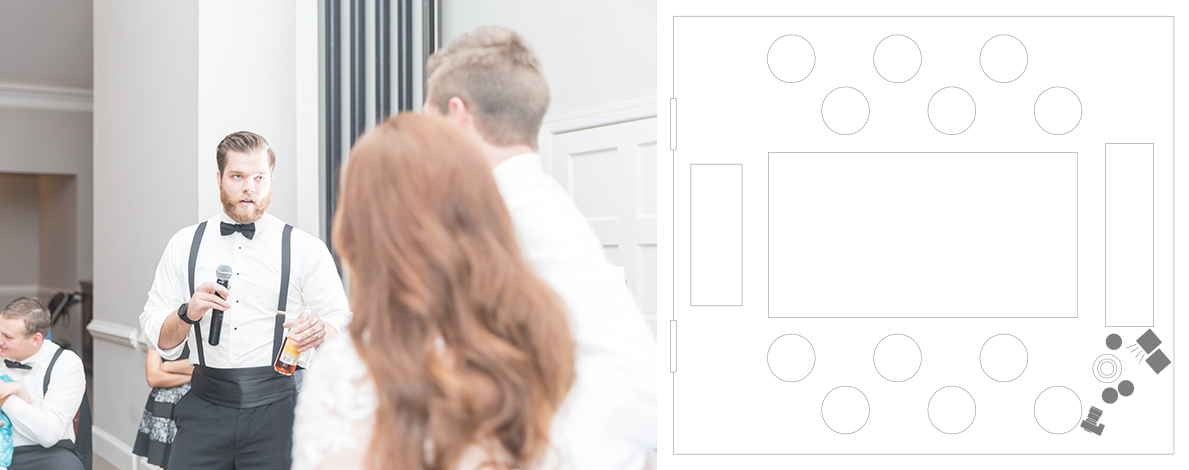
The second image you see is during the best man’s toast. The lights didn’t need to move because Ivan & McKenzie stayed right next to the cake table. So Ryan was able to get behind Ivan and McKenzie and get this shot. His on-camera flash is lighting the couple and his of-camera flash is lighting the best man’s face and giving it some dimension. Imagine this image with no off-camera flash. The best man would be dark in comparison with Ivan & McKenzie. Now imagine this image with no on-camera flash. The best man would be well-lit but the couple would be dark. Both are important!
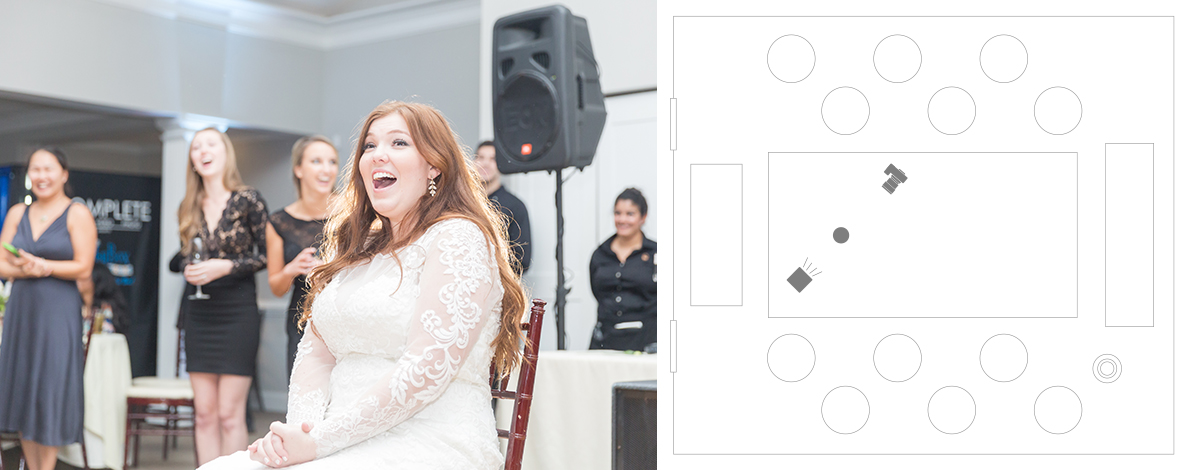
Here’s one final image that was captured as we got close to the end of the evening. The DJ was doing his entertainment thing (and doing it quite well, we might add!) and he had McKenzie sit a chair on the dance floor. We knew she was most likely going to be sitting there for a few minutes and we wanted to get some great reaction shots. Now, we could have used a “one on-camera flash” setup here and just left our off-camera flash out of it. We would have gotten a great usable image! But we knew that adding in our off-camera flash was going to take this baby to the next level. And we are aaalllll about next level! So we quickly grabbed our off-camera flash and set it behind McKenzie so we could get that magical hair-light!
Wowzer!!! That was a lot of info and we hope we didn’t overload you!
We want to share one final point to take into consideration. Because, hey, you’re already swimming in information. Why not?! One more thing to think about is your flash power. If you are using your flashes in manual mode (and we believe whole-heartedly that you should be!), you can control the power of your on-camera and off-camera flashes. With the 600ex-rt’s, and as with most flashes, you can control each flash individually. And when you can get a handle on that skill? Game-changer!!! Our general rule of thumb is that we want the off-camera flash to be about 1 stop higher in power. So if our on-camera flash is at 1/16th power, we want our off-camera flash at 1/8th power. The reasoning behind that is to avoid the “flash look” by overpowering your on-camera flash with the power of the off-camera flash just slightly. Again, there are tons of exceptions to that rule, but it’s a good place to start!
There are thousands of opinions on how to light receptions properly! But the way we choose to light receptions is based on our style. We love natural light. We love a bright, airy style. And if we can accomplish that inside a reception, then that’s what we want! We hope this helps!
Your friends,
Ryan & Alyssa
If anyone has any other questions, no matter how small, please don’t hesitate to email us your questions at info@ryanandalyssa.com! We would be humbled to try and answer your question as best we can!


Pingback: Where Do I Start? | Ryan & Alyssa Photography()
Pingback: Needle In A Haystack | Ryan & Alyssa Photography()
Pingback: A Natural Feel | Ryan & Alyssa Photography()